Seamlessly integrated with Jupyter Notebooks, our AutoML platform, and A2A automation systems.
Auto-generates Python code, debugs errors, creates stunning visualizations, and builds ML models—all through simple conversation in our intelligent chatbox.
✨ Just type what you want. No coding, no complexity—pure AI-driven analytics!
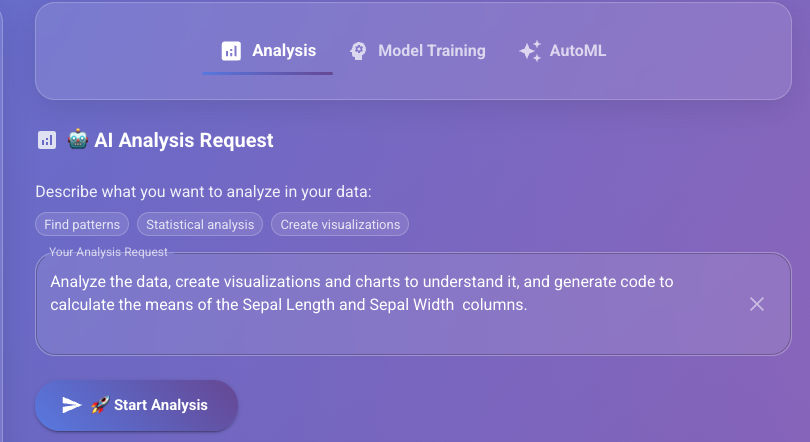
Experience the future of data analysis through natural conversation—no technical expertise required:
"Analyze this sales data, create visualizations, train a prediction model, and export the results to my notebook"
Our intelligent chatbox understands complex requests, breaks them into actionable steps, and executes everything automatically while keeping you informed of progress.
AutoML: Quick Start for Developers
🔑 Get API Key
1. Sign up a free VecML account.
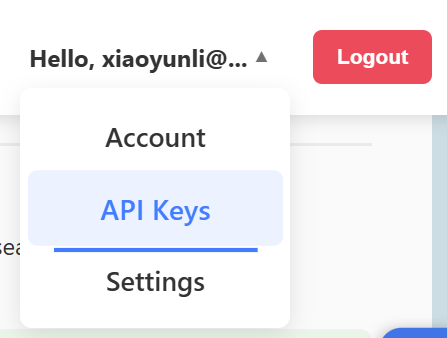
Sign Up2. After login, generate an API key. Please save and keep the key at a safe place, it will only be seen once when created.
Get API KeyYou can manage your API keys in account center from the top-right panel.
🏗️ Create Project & Collection
Create a project called "AutoML-Demo" and initialize the training data collection "training_data" within the project, with "dense" vector type and dimension 64. We will use Python as the example language.
import requests
import json
import numpy as np
import time

API_KEY = "replace_this_with_your_api_key"
BASE_URL = "https://db.vecml.com/api"

def make_request(endpoint, data):
    """Helper function to make API calls"""
    url = f"{BASE_URL}/{endpoint}"
    response = requests.post(url, json=data)
    print(f"Request to {endpoint}: HTTP {response.status_code}")

    if response.text:
        try:
            json_response = response.json()
            print(f"Response: {json_response}")
            return response.status_code, json_response
        except requests.exceptions.JSONDecodeError:
            print(f"Response: {response.text}")
            return response.status_code, {"error": "Not JSON", "message": response.text}
    else:
        print("Response: Empty")
        return response.status_code, None

# 1. Create a project
project_data = {"user_api_key": API_KEY, "project_name": "AutoML-Demo", "application": "Machine Learning"}
status, response = make_request("create_project", project_data)

# 2. Initialize training dataset
init_data = {"user_api_key": API_KEY, "project_name": "AutoML-Demo", "collection_name": "training_data",
             "vector_type": "dense", "vector_dim": 64}
status, response = make_request("init", init_data)📤 Insert Data
Upload your vector embeddings efficiently using batch operations with "/add_data_batch" endpoint. This endpoint is asynchronous: the server will respond with a job ID for /add_data_batch. You can call "/get_upload_data_status" endpoint to track the status of the job.
Here we just simulate a binary classification model with random vectors and categorical feature "category". When uploading the data, all categorical features and the prediction target "label" should be included as vector attributes.
VecML also supports other data insertion methods like upload through files. See full documentation for AutoML API usage instructions.
def wait_for_job_completion(job_id, status_endpoint, max_wait_time=60):
    """Wait for an async job to complete"""
    start_time = time.time()

    while True:
        status_data = {"user_api_key": API_KEY, "job_id": job_id}
        status, status_response = make_request(status_endpoint, status_data)

        if status_response and status_response.get("status") == "finished":
            return True
        elif status_response and status_response.get("status") == "failed":
            return False

        if time.time() - start_time > max_wait_time:
            return False

        time.sleep(2)

def generate_dataset(num_samples, vector_dim, id_prefix, seed=2025):
    """Generate dataset with linear decision boundary"""
    np.random.seed(seed)
    vectors = np.random.randn(num_samples, vector_dim).tolist()
    categories = [np.random.choice(['A', 'B', 'C']) for _ in range(num_samples)]

    labels = []
    for vec, category in zip(vectors, categories):
        # Linear combination of first few components plus category weight
        score = sum(vec[:20]) + {'A': 1.0, 'B': -0.5, 'C': 0.0}[category]
        label = '1' if score > 0 else '0'
        labels.append(label)

    # Generate IDs and attributes
    ids = [f"{id_prefix}_{i:03d}" for i in range(num_samples)]
    attributes = [{"label": str(label), "category": category} for label, category in zip(labels, categories)]

    return vectors, ids, attributes

# 3. Generate and add training data using add_data_batch
vectors, ids, attributes = generate_dataset(num_samples=1000, vector_dim=64, id_prefix="train", seed=2025)

# Add training data in batch
batch_data = {"user_api_key": API_KEY, "project_name": "AutoML-Demo", "collection_name": "training_data",
              "string_ids": ids, "data": vectors, "attributes": attributes}
status, response = make_request("add_data_batch", batch_data)
train_upload_job_id = response["job_id"]

# Wait for training data upload to complete
if not wait_for_job_completion(train_upload_job_id, "get_upload_data_status", max_wait_time=30):
exit(1)🧮 Train AutoML Model
Train an AutoML model for a data collection with specified categorical features and target label.
Model training is asynchronous: call "/get_automl_training_status" to check the job status.
# 4. Train AutoML model
train_data = {"user_api_key": API_KEY, "project_name": "AutoML-Demo", "dataset_name": "training_data",
              "model_name": "model1", "training_mode": "high_speed", "task_type": "classification",
              "label_attribute": "label", "categorical_features": ["category"]}
status, response = make_request("train_automl_model", train_data)
train_job_id = response["job_id"]

# Wait for training to complete
if not wait_for_job_completion(train_job_id, "get_automl_training_status", max_wait_time=60):
exit(1)🔮 Model Prediction
After the model is trained, generate predictions for a test dataset. You can either predict on an existing data collection in the project, or upload a data file ad-hoc for prediction. In the example, we create a new data collection as the prediction dataset.
# 5. Initialize prediction dataset
pred_init_data = {"user_api_key": API_KEY, "project_name": "AutoML-Demo", "collection_name": "prediction_data",
                  "vector_type": "dense", "vector_dim": 64}
status, response = make_request("init", pred_init_data)

# 6. Generate and add prediction data
prediction_vectors, prediction_ids, prediction_attributes = generate_dataset(num_samples=100, vector_dim=64, id_prefix="pred", seed=2026)

# Add prediction data in batch
pred_batch_data = {"user_api_key": API_KEY, "project_name": "AutoML-Demo", "collection_name": "prediction_data",
                   "string_ids": prediction_ids, "data": prediction_vectors, "attributes": prediction_attributes}
status, response = make_request("add_data_batch", pred_batch_data)
pred_upload_job_id = response["job_id"]

# Wait for prediction data upload to complete
if not wait_for_job_completion(pred_upload_job_id, "get_upload_data_status"):
    exit(1)

# 7. Make predictions using the existing dataset
predict_data = {"user_api_key": API_KEY, "project_name": "AutoML-Demo", "dataset_name": "training_data",
                "model_name": "model1", "prediction_dataset": "prediction_data"}
status, prediction_results = make_request("automl_predict", predict_data)
🎉 Congratulations! You're all set to use VecML AutoML!
Pro Tips for Getting Started with AutoML
Here are some tips to help you make the most of VecML’s AutoML capabilities:
- Choose the right problem type. AutoML supports classification, regression, and clustering—pick the one that matches your label structure and business goal.
- Balance the speed-accuracy trade-off. AutoML supports three training modes: "High Speed", "Balanced", and "High Accuracy". "High speed" mode trains extremely fast but with slightly lower accuracy; "High Accuracy" takes more time to train but yields best prediction accuracy. Choose the training mode based on your bussiness needs.
- Feature engineering matters. While AutoML will try standard data normalization to boost the performance, adding or dropping key categorical features may dramatically boost model quality. Pick the most relevant features to your prediction goal.
- Start small, then scale. Use a subset of your data (10–20%) to prototype pipelines, inspect logs and metrics, then run full-data training once you have the right settings. Try with our sample datasets to get familiar with the AutoML workflow before training your own data.
AutoML Example Applications
These workflows show how to apply AutoML to real-world scenarios:
Customer Churn Prediction
Automatically train a model to identify customers at risk of churn.
- Upload past user activity and subscription metadata.
- Select “classification” and choose churn label.
- Review the feature ranking and drop irrelevant columns.
- Run AutoML with AUC as the primary metric and early stopping enabled.
- Deploy the best model to score new users in real time.
Sales Forecasting
Use regression AutoML to predict monthly sales volume.
- Provide historical sales numbers and promotional calendar.
- Choose “regression” and RMSE as the optimization metric.
- Enable time-based feature generation (lags, rolling windows).
- Run AutoML and compare top 3 models on a hold-out period.
- Schedule a daily retrain to keep forecasts fresh.
Anomaly Detection
Detect outliers in sensor or log data without writing custom rules.
- Upload “normal” operation data (no known incidents).
- Select “clustering” and set number of clusters to 1 or 2.
- Run AutoML and inspect which points fall outside the main cluster.
- Integrate with alerts to flag new anomalies in production.
Hyperparameter Tuning
Fine-tune your own model with an automated hyperparameter search.
- Upload your preprocessed features and labels.
- Choose “custom model” and supply your training script.
- Define the hyperparameter search space (e.g. learning rate, tree depth).
- Run AutoML’s grid or Bayesian tuner and monitor trial progress.
- Deploy the best-performing combination to production.
Data Format and Sample Datasets
VecML Database supports a variety of data formats for vector storage and retrieval. Below you'll find sample datasets to help you get started with testing and exploring the capabilities of our vector database.
Quick Start Tip
Download one of our sample datasets and upload it directly to your VecML project to start experimenting with VecML's efficient and accurate AutoML platform within minutes.
CoverType (CSV Data Matrix Format)
A benchmark machine learning dataset from UCI repository, dim = 54, # of classes: 7. Label column: "Cover_Type"
covertype_train.csv (67.6MB, 531,012 samples) | covertype_test.csv (6.4MB, 50,000 samples)svmguide3 (LIBSVM Sparse Format)
A small LIBSVM sparse format dataset from LIBSVM website, dim = 21, # of classes: 2. Each line starts with the label (integer).
svmguide3_train.svm (300KB, 1,243 samples) | svmguide3_test.svm (11KB, 41 samples)Sample Dataset Use Cases for Machine Learning
CoverType
Ideal for: Classification, AutoML model training
The CoverType dataset contains cartographic variables used to predict forest cover type. With 54 features and 7 classes, it's an excellent dataset for testing VecML's AutoML capabilities.
Quick start:
- Download the covertype_train.csv sample
- Create a new dataset in AutoML mode
- Specify "Cover_Type" as the label column
- Train a classification model using VecML AutoML
- Evaluate the model using covertype_test.csv
Dataset Import Guidelines
Follow the following guidelines to ensure your dataset can be successfully imported and parsed into VecML Database:
| Format | Required Item | Optional Parameters | Best For |
|---|---|---|---|
| JSON | Whether containing field name | ID/vector/attribute fields | Datasets with rich metadata |
| Binary | Dimensionality, data type | None | Large datasets, performance-critical applications |
| CSV | Whether containing column name | ID/attribute column | Tabular data, analytics workflows |
| LIBSVM | Proper key:value format | None | Sparse datasets, classification tasks |
Supported Data Formats
VecML Database supports multiple data formats to accommodate different use cases and data sources. Below are detailed descriptions of each format and how to use them effectively.
JSON (JavaScript Object Notation) format is ideal for storing vector data along with metadata. Each vector is represented as a JSON object with fields for the vector values and additional metadata.
Key features:
- Human-readable format
- Supports metadata for vectors. Currently, we only support the flat structure of metadata without nested structures. See the below example.
- Easy to process with standard libraries
Example JSON with field names:
Example JSON with NO field names:
Import tips:
When importing JSON data that contains field names, specify the "vector data field" (e.g., "openai") and optionally the "ID field" (e.g., "_id"). You can select any additional fields which will be stored as metadata that can be used for filtering and retrieval.
Binary format is efficient for storing large vector datasets and is available in different numerical types. Currently we support Float32 and Uint8 data types. For Float32, every consecutive 4 bytes will be read as a Float32 value; for UInt8, every byte will be read as a unsigned 8-bit integer value. This format stores raw vector values without metadata, making it compact and fast to process, suitable to large-scale applciations.
Key features:
- Space-efficient storage
- Fast loading and processing
- Ideal for large datasets
Import tips:
When importing binary data, you need to specify:
- Vector dimensionality (e.g., 1024 for personahub, 784 for MNIST)
- Numerical type (Float32, UInt8, etc.)
CSV (Comma-Separated Values) format is widely used for tabular data and is supported by many tools and platforms. CSV files can be used to store vector data where each row represents a vector and its associated attributes and/or metadata.
Key features:
- Compatible with spreadsheet software and data analysis tools
- Easy to generate and edit
- Good for datasets with consistent schema
Import tips:
When importing CSV data:
- The CSV file may or may not contain headers (column names). Based on the data preview, specify whether the data has headers or not.
- Specify all the attribute/metadata columns. For training maching learning models, include the class label (for classification) or response (regression) as attributes.
LIBSVM format is designed for sparse datasets where most feature values are zero. It uses an efficient key:value representation that only stores non-zero values.
Key features:
- Extremely efficient for sparse and high-dimensional data
- Commonly used in machine learning applications
- Reduces storage and processing requirements
Import tips:
When importing LIBSVM data, if the first value on a line is a single integer, it will be treat as the label. If the line starts directly with key:value pair, then no label is read for that line.